Desert Online General Trading LLC
Dubai, United Arab Emirates
Desert Online General Trading LLC
Dubai, United Arab Emirates


🔧 Elevate Your Machining Game!
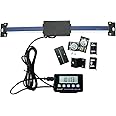
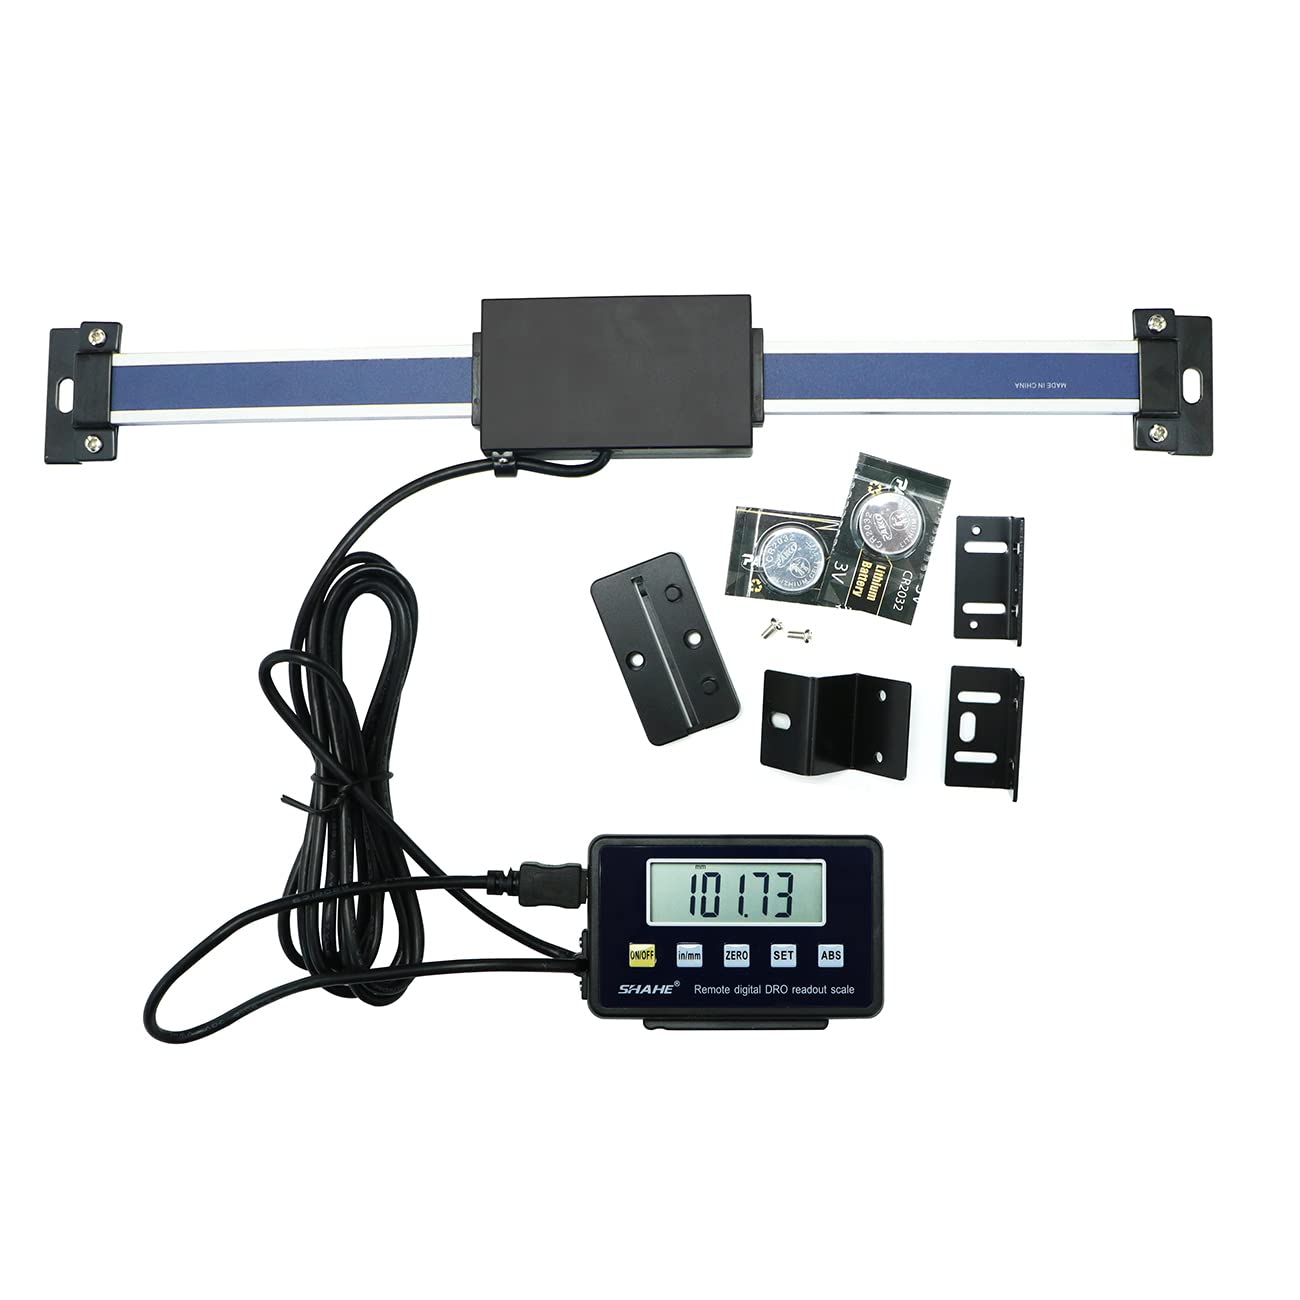
The 0-200mm Digital Readout Linear Scale is designed for precision measurement in milling machines and lathes, offering a measuring range of 0-200mm with an accuracy of ±0.08mm and a resolution of 0.01mm. Its large remote LCD display ensures easy reading, while its versatile application makes it suitable for various industrial uses. The package includes all necessary components for immediate installation.


V**2
Really good set of scales at a great price.
This is a great set of scales. It is very easy to install but it must be free to guide easy to read correctly. You will need a little knowledge to get it set up to read correctly for the complete travel.
S**N
Better than Wixey, could be perfect with addition of one feature
These are so much better than Wixey. Lacking one feature that would make them perfect: calibrating to a specific distance. You can only zero this gauge, so it works great for something like a router table or drill press where you generally start with a reference surface and just need to calculate the offset. On something like a planer or a drum sander, though, with a fixed cutting plane and a movable bed that won't go all the way to zero, you'll have to determine how far the bed is from the cutting surface and do that math in your head every time. In this case, I zero the gauge at 5mm or 10mm to make the math easier and write that down on the machine, next to the readout. Well worth the price and accurate.The Wixeys are reliably corrupted by static electricity, which makes them almost useless to me. These (six of them) have never had that issue.
J**Y
Great digital readout for jointer
I bought this hoping to add a digital readout to a standard 6" jointer, and it worked far more easily than I anticipated. The photos show the DRO attached to the jointer (an older Bridgewood model fitted with a helical cutterhead). The steps to fit it to the jointer were:1. Determine where the end brackets need to be so the guide bar is parallel to the infeed table ways, and drill and tap 8-32 holes in the jointer base for the mounting screws.2. Attach the end brackets, and use these to determine how long the bar needs to be, and cut the bar to this length (mine came out to exactly 6" - who'd have thought...). Since the bar is aluminum, it's easily cut with a hacksaw and cleaned up with a file.3. Place the guide bar and carriage into the brackets, and measure the distance from the bottom of the carriage to the side of the infeed table to determine the carriage attachment bracket depth.4. Adjust the supplied carriage attachment bracket to provide the necessary depth for attachment as measured in the previous step. This may involve adding spacers, or as in my case flattening out the "z" in the bracket to reduce the depth.5. Remove the guide bar assembly, attach the bracket to the carriage, re-attach the guide bar to the end brackets, and determine where to drill and tap a hole for the screw to fasten the carriage bracket to the infeed table (mine landed exactly on the hole from the original arrow indicator, so just needed to be enlarged and tapped - as they say, it's better to be lucky than to be good), and attach to the infeed table6. Adjust the table to give a 0 depth of cut, and use the zero-set button to calibrate the gaugeThe whole process took just about an hour, and initial testing seems to indicate it's quite accurate.A couple of caveats:- Put the batteries in first and see which orientation of the carriage gives positive versus negative measurements - you really want to have positive measurements increasing as you lower the infeed table, i.e., as the carriage moves to the left. For me, this meant orienting the carriage with the output wire on top- The measurements given by the DRO need to be scaled by some factor to get the actual depth of cut, since the DRO measures the travel along the angled ways. You can determine this by using the existing scale along the infeed table, which will show how far the infeed table needs to be slid down to get a desired depth of cut. In my case, the factor was exactly 2, so the depth of cut is exactly half of what the DRO shows - i.e., if the DRO shows .050", the depth of cut is .025". I don't know if this is the standard angle used for jointers, or specific to my machine, so you might have a different factor. (It would be great if the manufacturers provided a mechanism to set a scale factor to make it ideal for applications like these.)
M**E
Inexpensive accurate measurement
I have three of these in use on different machines (lathe tailstock, lathe compound slide, CNC plasma table vertical axis). The readouts match those of the adjustment wheels on the machines or comparison measurements. They’re easy to install and can be simply cut to custom length with a hacksaw. Would certainly recommend. Excellent value.
B**Y
Fairly Accurate
I am not sure if these would be accurate enough for a milling machine or lathe work, However, I have bought 3 of them. Most drill presses don't have any decent depth gauge or stop on them. Let alone any kit to do so. So, DIY in what I need. These can be cut and shorten if the length is to long and does not effect operation of them. Cutting is tricky due to glass glue to aluminum bar - die cut-off wheels doesn't hack it. the mounting hdwe is easy to modify. Wish there was a way to shorten the wire cable to display. The display work in metric or inches {I still do both}. I like the zeroing out feature, allowing me to set my own zero reference point anddrill to my require depth for that hole and reset it for something else. There really isn't any hdwe out there that a person can buy to attach the drill's spindle and to the digital slide assy. Mine our all hand crafted.
A**P
Works well
Does just what it says.
J**S
cheapest way to put a dro on anything u need a dro on
didn't really like how i had to mount the first one on my mill but i didnt have access to a set of taps but i do now an i have a set of scales for all 3 axis now so i'll be revisiting the one i have mounted already, the white bracket i printed so that was not something that was included but there was a couple brackets that was supplied with the scales and i maybe able to use them now that i can drill an tap the holes to mount it but if u have a lathe or a mill an want a dro but dont want to have to spend a crazy amount of money this is the way to go. this is the first mill an lathe ive ever gotten to use so its all for me to learn with an this is not a cheap hobby to get into so anytime i can find away to do something while saving money im all about it an this works. im sure the actual mill dro systems are better and can do alot more with them but thats goals for later an its just nice to be able to have something that works without costing a fortune to buy.
Trustpilot
1 month ago
2 months ago