


Full description not available


| Installation Type | Surface Mount |
| Optical Sensor Technology | CMOS |
| Voltage | 12 Volts |
| Compatible Devices | Monitor |
| Connector Type Used on Cable | RCA |
| Lux rating | 0.2 Lux |
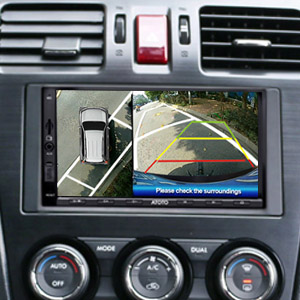
| Real Angle of View | 360 Degrees |
D**9
Calibration is tricky but great once done properly
I installed this on my atoto s8 ultra. I had to remove my old backup camera because I read this would only work specifically with the camera it came with. Installation was simple enough. Make sure the red wire is at the back of your vehicle connected to the backup lights. Now for the calibration. It took me 2 hours to figure this thing out because it always failed no matter what it do. Here's how I did it. Follow the directions on the manual.1. Do it during daylight or a bright garage2. Don't have anything on it, if it's windy, do it in your garage.3. Make sure the creases on the calibration cloth do not carry shadows as it messes up the calibration4. Make sure you enter the right dimensions for your car. If you have a tow tongue sticking out, add a few inches to your car length.5. If you're using the metal bracket like I did, make sure to TILT IT DOWNWARDS slightly so it faces the calibration cloth. This step is VERY IMPORTANT. That did it for me! Without tilting it, it is perpendicular to the ground and it will NOT work!6. Adjust the offset of the center of your carAfter the calibration is done you can customize it and crop the picture so it doesn't look like a fish eye lens.Now you can show off to your friends!
Trustpilot
1 month ago
2 months ago
